Showing posts with label nail art. Show all posts

Tuesday, October 15, 2013

Paradise Blue Cheetah and Gilty Gold Zebra

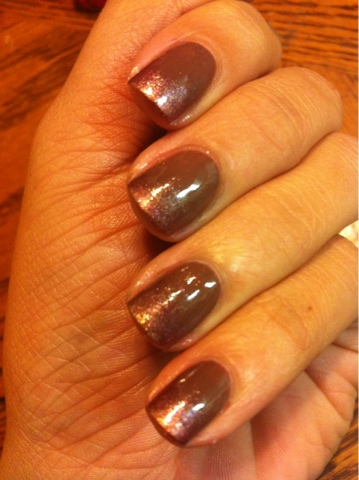
 I'm attempting to paint my nails as often as possible during my break from piano. I raided my roommate Ashley's np stash and found two new favorites: "Paradise" by Sinful Colors and "Gilty Pleadure" by Sally Hansen Complete Manicure. Paradise is a bright creamy sky blue which I can only imagine is even more beautiful in the daytime. I sit here admiring it in artificial light and can't wait for the sun to come up. I'll have to update you all with a daytime pic soon. It was two coats to full opacity. The first thin coat was streaky and I almost started to doubt my decision on picking a Sinful Colors polish out of her stash instead of a higher quality. But I was thankfully reassured by a thicker 2nd coat which brought the color to a dreamlike consistency. Gilty Pleasure is a champagne gold I used to make a couple streaks in my last post. I love it and it's so perfect on any skin color. Again it's two coats to opaque but with a light color like this, three should be perfect. I don't like to do three coats because, frankly, ain't no one got time fo that. 
I was a little disappointed in myself for not thinking outside the box and reverting to animal print. I promise my next post won't be something I've done a thousand times over. Hope you enjoy!

Welcome Back! Almond Acrylics in Fall Colors

Hello, my darlings! I am back and super excited to be blogging again. After nail school I went through a tremulous move back to Oakland and wasn't able to blog for a while. So here's my first set back: an almond shaped acrylic set with three base colors: OPI Don't Pretzel My Buttons, Essie School of Hard Rocks and  OPI Over the Taupe. I added a 1mm rhinestone to the DPMB and SHR and on the OTT I did 3 slashes of Sally Hansen Complete Manicure in Gilty Pleasure and a black art polish. I'm going to try really hard to blog more often- I've missed all of you and thank you so much for visiting during my hiatus!! See you soonsies <3 


Monday, December 10, 2012

Full Sets At School :)

OMG you guys, I've been such a bad blogger!!!! Ironically, it's because I've been super busy with school- I've been taking the manicuring course at Paris Beauty College in Concord, CA and I haven't been able to finish my fall challenge or blog at all! Here are a couple of pictures of the acrylic full sets I've been doing at school the last few weeks. I don't know if I'll have a chance to blog again before school is over but I'm trying to continue to snap pictures if I can! 


This set is my hand model Chrissy's hands. She gets almond shaped nails because she's a vet tech and she wears gloves and has to pick up kitties by their necks and such. She loves 3D nail art of course and got tiny white bows on a few of her nails and clusters of multi colored half pearls on the rest. 


These are DUCK FEET nails. My first set of duck feet actually on someone else. In the beginning of school, I did a full set of duck feet on myself, but these were much better. Also, the girl that got these nails was going to homecoming that weekend so it made it super fun for me to do. I used forms instead of glue on nail tips to get this flared out look.

These are just fun two toned funky french acrylics with cut out stars embedded in the acrylic. I finally had to bring my drill to school because I think I'm getting RSI from hand filing. Sad, but it's so much fun doing acrylics at school. 


That's all for now, you guys, so hope I can get back to blogging once my busy busy schedule dies down a bit! 

Saturday, September 8, 2012

Fall Nail Art Challenge Day 3: Fall Gradient

Well, I picked two colors that I thought were suitable for fall: Mink Muffs by Essie, a cool chalky light brown, and Meet Me On The Star Ferry by OPI, a brown purple shimmer. I painted on two coats of Mink Muffs and then used a makeup sponge to dab MMOTSF on the tips and working toward the nail bed. Even though it is a purple brown shimmer, it came out looking a little gold and I'm pleased with the end result.

Friday, September 7, 2012

Fall Nail Art Challenge: Day 2 Autumn Leaves

This one was so tough! I thought I had a stamp that had maple leaves, but I guess I just have the almond shaped ones from BM-19. I tried to make the leaves stamp change colors but I guess I'm not that advanced at stamping yet. I painted on OPIs Bling Dynasty (über pretty gold) and then in a bottle cap mixed neon orange and Bling Dynasty/green and Bling Dynasty) to make the gold turn colors a bit but stay the same kinda shimmery metallic. I lightly with a dry brush tapped random spots on the nail with my orange and green mixtures to give it an antiquey, messy feel.

Then stamped on the leaves in an old Sinful Colors black that's gone thick.

::phew!:: a lot of retries, and finally Day 2 is over!

Wednesday, September 5, 2012

Seven Day Fall Challenge!

Tin Roof Nails started a brand new challenge, just in time for the changing season! It's a quickie: a 7 day fall nail art challenge-


Here's the link to the challenge and check her blog out at Tin Roof Nails here. Spread the word before it's freakin winter already!

Sunday, August 19, 2012

Matte Camouflage Accent Nail with Zoya Envy

Ahhhh, Zoya Envy, you are my favorite almost-black. I love this super dark green. It inspired me to do a sweet green camo accent nail that I matted out with ELFs Matte Finisher.

First, I painted all but my rings with 2 coats of Zoya Envy. Then 2 coats on the ring fingers of Essie Mink Muffs. I sloppily did squiggly horizontal lines of a mix of Mink Muffs and a green franken I conjured up a while back. A few squiggly lines of a dark green which has no name (from some kind of art kit), and a few squiggles of Envy to tie it all together. I did a coat of super shiny Seche Vite to smooth out the creases then topped with one coat of the Matte Finisher. Can you see me?

Monday, July 2, 2012

Bye, Bye, Birdie

My hand model, Oddrey came over with an idea for these swallow or birds flying silhouettes. I looked up a couple pictures of bird silhouettes and decided on this design. Just two coats of a white creme, and painted these on with this dark teal color my gf Megan brought me from China. It doesn't have a name but I will swatch and post a picture of the bottle in another post! Enjoi.

Sunday, June 17, 2012

Americana Nails <3

Ya, I know I'm a lil early, but the 4th of July is my favorite holiday do I'm going to start doing my red, white, and blues now!

Just a simple stars and striped funky French. Blue tips with white stars stamped from the 1st Konad plate on the thumb and index; white tips with shakily painted red stripes on the pinky, ring and middle. All detailed with a delicate outline of silver glitter to hide the imperfect smile lines. More USA nails to come!

Friday, April 20, 2012

Marvels The Avengers

Oh yeah. I did some Avengers logos for ya. Hulk, Iron Man, Captain America, Black Widow, and Thor. And that's that.

Friday, March 16, 2012

St. Pattys Mani!!

I painted my nails just 2 coats of Mint Sorbet by Sally Hansen. And added green iridescent heart shaped glitters in the shape of a clover. Four hearts with their pointy parts together make the cutest little lucky clovers! I adhered them with brush on nail glue and layered a few coats of Seche Vite to seal them in.

Sunday, February 12, 2012

Last Vday Mani (#5) Heart Stamping and Argyle

This last mani for Vday has a little but of everything. My base color was a bright pink Dream Poppy by Wet N Wild. I used that color with a bit of white mixed in to make the triangles of the argyle accent nail and for the stamped hearts (m03). And silver striping tape cut to make the lines for the argyle. *So over Valentines Day already*

Saturday, February 11, 2012

Valentines Mani #3 and 4- Heart Print

So I grouped these two nail designs together because both of them have a heart print design made from a dotting tool. The first is the NYC crooked "O" LOVE sculpture painted in Dream Poppy by Sally Hansen, on top of a base coat of Raise Awareness by Essie. The other is basically the same dotting tool heart pattern on a French. I can't write much because I'm on my phone so I'll edit and update later with the colors and more instructions. Sorry, readers <33333

Thursday, February 2, 2012

Valentines Mani #2: Jungle Funky French

This wasn't what I had in mind when I sat down to do a second valentines mani- it just happened. It's a super sparkly animal print funky French that had tiny pops of pink (it looks purple but it's pink) inside the cheetah print. I used metallic pink hexagon glitter to and outlined it in black to make a cheetah print. Underneath this is a white French tip, covered in Metallica by Wet n Wild, with an unnamed silver glitter on top of the silver part. Then I added a black zebra. It's fun, sparkly and is definitely a contender for actual Valentines day nails.

Wednesday, February 1, 2012

Valentine&apos;s Day Mani #1!!

Ahhhh.... Valentines Day... One of my favorite holidays because I love pink and hearts! Hopefully, I'll get flowers for that vase I got for Christmas (wink, Kevin!! ;) so here is my first mani for Vday! I painte on 2 coats of Blazed by Wet N Wild, and a coat of LCD by Sally Hansen HD. I then used a dotting tool to make white dots that touch in the shape of a heart on my ring finger. I filled this in with red striper polish, and used clear coat and a dotting tool to cover the red part of the heart in 1mm red hexagons. I used a black polish to paint on the "T+K" carefully and added black heart cut out decals to match! The T+K stands for Tina plus Kevin! Tina plus Kevin Forever! ;)

Monday, January 30, 2012

Striped Nail Art Inspired by New Striped Apron

I've had this brightly colored pink, black, and green fabric for a long time now and always thought about using it for an apron but never got around to it. I've been wanting a new full sizes apron as my other one is white and horribly stained. So I whipped this cute pink and black one up today and did a quick (albeit, sloppy!!) nail art to commemorate!

I used a hot pink Baby Cakes by Jessie's Girl, light pink Raise Awareness by Essie, lime green Green WIth Envy by Sally Hansen, and strippers in green, pink and black. I just followed the pattern on the fabric to make vertical stripes as carefully as possible and topped with lots of topcoat to smooth out the seams. :)

Friday, January 20, 2012

Green Glitter Fishy Scales

Ya, it could be another kinda animal that has scales, but it's scales nonetheless. I used my bright neon green Franken as a base for my entire nails then slowly and painstakingly placed on iridescent neon green 1mm hexs down. Basically that's it. It's a fun and easy nail art to do that even looks good in the dark!

Thursday, January 12, 2012

Fimo Fruit Ninja Nails

Because I'm obsessed with Fruit Ninja on Kinect for Xbox 360, here is a set of my fimo fruit ninja nails and a creen shot, just in case you aren't familiar with arguably the best arcade game ever, and a shot of our house leader board ><.

Monday, January 9, 2012

Pastels and Kawaii Totoro Nail Art!!

Last night, my girlfriend and dear hand model Chrissy came over with yet another kawaii nail idea: Totoro nails!! Unfortunately my boyfriend was blocking my nail area while he played Kinect on Xbox so we had to make due with the polishes that were in my train case from the morning's out of the house gig I did on my friend Jessica. I laid down two coats of the creamy minty green "mint sorbet" by Sally Hansen. Followed by black spiky balls with white eyes, a white bunny, and a grey bunny- I will repost this with the names of the characters- sorry, Totoro fans!

My pink with flowers nail art is "Raise Awareness" by Essie. Laden with a rainbow glitter my dad gave me for Christmas and topped with "Mint Sorbet" and white flowers. The centers of the flowers are these pastel shiny dots that are actually the eyes that pop out of my playboy glitter! They were loose floating around the bag the glitter box came in and I saved them for a rainy day. Not so rainy was last night, but I was glad to find use for them!

Monday, January 2, 2012

First Mani of 2012!

I'm going to see how long I can keep my fake nails off so I can blog more! I painted on 2 coats of Essie's "Mink Muffs" as a base coat. A super creamy greyish brown creme that I love! On top of that I took a striped brush dipped in OPI "I Brake For Manicures" and made six lines in groups of threes coming from the edge of the nail in. I wanted to add a little bit of shimmer so I also drew on lines of OPI "Meet Me At The Star Ferry", a pinkish brown shimmer that looks really nice paired with Mink Muffs.