Hello, my darlings! I am back and super excited to be blogging again. After nail school I went through a tremulous move back to Oakland and wasn't able to blog for a while. So here's my first set back: an almond shaped acrylic set with three base colors: OPI Don't Pretzel My Buttons, Essie School of Hard Rocks and OPI Over the Taupe. I added a 1mm rhinestone to the DPMB and SHR and on the OTT I did 3 slashes of Sally Hansen Complete Manicure in Gilty Pleasure and a black art polish. I'm going to try really hard to blog more often- I've missed all of you and thank you so much for visiting during my hiatus!! See you soonsies <3
Showing posts with label stripes. Show all posts
Tuesday, October 15, 2013
Sunday, June 17, 2012
Americana Nails <3
Ya, I know I'm a lil early, but the 4th of July is my favorite holiday do I'm going to start doing my red, white, and blues now!
Just a simple stars and striped funky French. Blue tips with white stars stamped from the 1st Konad plate on the thumb and index; white tips with shakily painted red stripes on the pinky, ring and middle. All detailed with a delicate outline of silver glitter to hide the imperfect smile lines. More USA nails to come!
Sunday, February 12, 2012
Last Vday Mani (#5) Heart Stamping and Argyle
This last mani for Vday has a little but of everything. My base color was a bright pink Dream Poppy by Wet N Wild. I used that color with a bit of white mixed in to make the triangles of the argyle accent nail and for the stamped hearts (m03). And silver striping tape cut to make the lines for the argyle. *So over Valentines Day already*
Monday, January 30, 2012
Striped Nail Art Inspired by New Striped Apron
I've had this brightly colored pink, black, and green fabric for a long time now and always thought about using it for an apron but never got around to it. I've been wanting a new full sizes apron as my other one is white and horribly stained. So I whipped this cute pink and black one up today and did a quick (albeit, sloppy!!) nail art to commemorate!
I used a hot pink Baby Cakes by Jessie's Girl, light pink Raise Awareness by Essie, lime green Green WIth Envy by Sally Hansen, and strippers in green, pink and black. I just followed the pattern on the fabric to make vertical stripes as carefully as possible and topped with lots of topcoat to smooth out the seams. :)
Monday, January 2, 2012
First Mani of 2012!
I'm going to see how long I can keep my fake nails off so I can blog more! I painted on 2 coats of Essie's "Mink Muffs" as a base coat. A super creamy greyish brown creme that I love! On top of that I took a striped brush dipped in OPI "I Brake For Manicures" and made six lines in groups of threes coming from the edge of the nail in. I wanted to add a little bit of shimmer so I also drew on lines of OPI "Meet Me At The Star Ferry", a pinkish brown shimmer that looks really nice paired with Mink Muffs.
Saturday, November 5, 2011
Pink Flowers, Rhinestones, and Pink Striping Tape
So I've been meaning to upload this, I couldn't find my camera USB cable thing for a few days. These are Chrissy's nails, my lovely hand model. She thankfully gets her nails done for my blog when I don't want to do mine or when I have poop nails that need to be filled. :) I painted her nails white (she's always trying to paint them white and I always talk her out of it!). I then used a medium dotting tool to make drag-petal flowers with Essie Raise Awareness (light baby pink) and OPI Elepthantastic Pink. I put tiny purple and blue rhinestones onto the middle of the flowers. For her accent nail, I left the base white, and when dried, I used my new pink metallic striping tape to make a lil fishnet-esque grid. I laid down the striping tape where I wanted it and then used clippers to cut the tape off where the nail ended. I topped with top coat and was pleased with the design. I only put one layer of top coat on, as she had somewhere to go and she did not upkeep with more top coat at her house. She later told me that the pink striping tape had shed it's color! She sent me a picture on my phone of her stripes still intact, but the pink had rubbed off to a dull grey/silver!~!! I would post this picture, but it was on my phone and I am lazy. I will retry this design with more top coat to see if I have the same problem, and also add this to my earlier review of my nail haul post.
I have 10 colors to try, so far, this is the only one I've used, and I'm very worried that it won't hold, because it's soo cute! Has anyone used striping tape like this? Or how would you use it?
Labels:
Chrissy,
Essie,
flowers,
nail art,
OPI,
pink,
rhinestones,
stripes,
striping tape,
white
Wednesday, October 19, 2011
30 Day Nail Challenge - Day 25 - Inspired by a Pattern - Burberry
Funny, I chose this for "pattern" instead of fashion. But this pattern is highly recognizable, so I hope I didn't totally make a mockery of it! I attempted to do the Burberry plaid, which is super hard because it has so many intersecting lines. I used a lot of top coat to smooth out the striping process.
My process is as follows:
1. 1 coat Apricot Beige by Caroina
2. Using the brush in the bottle, made thick "T" shapes on each nail.
3. 1 coat top coat. Let dry.
4. Using red striper brush, add the 4 red stripes, intersecting at the center of the beige square.
5. 1 coat top coat. Let dry.
6.. Using a custom striper brush, paint on one direction of the navy lines on each nail.
7. 1 coat top coat, and let dry.
8. Paint on the last 3 navy lines perpendicular to the first set, intersecting at the intersection of the white cross shape.
9. Then top coat to smooth.
Came out pretty smooth, huh? Coulda been a bumpy mess. :)
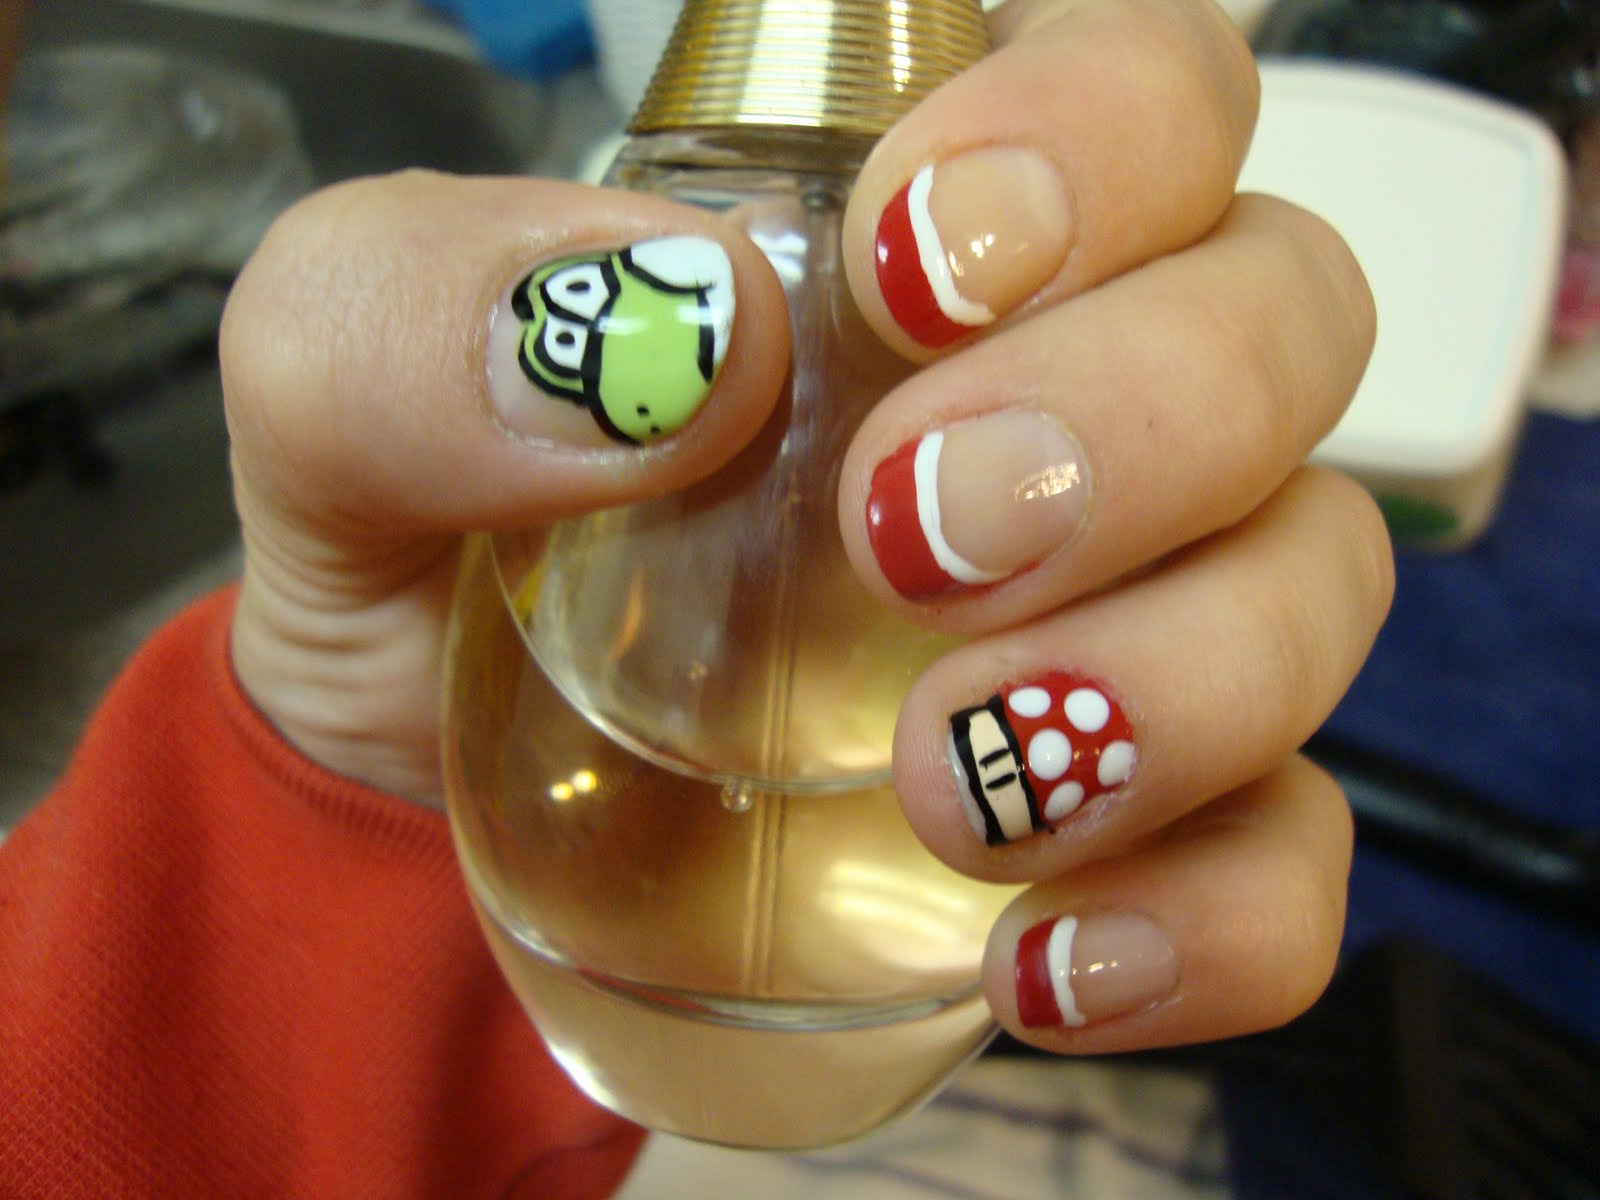
30 Day Nail Challenge - Day 24 - Inspired by Fashion
Thanks, to my hand model Oddrey, I was able to do posts for my challenge without taking off my current nail design. I searched the word "fashion" on Google Images and found this trio of Gucci dresses that I picked as my inspiration for fashion nails. I used black, white, and Mellow Yellow by Sally Hansen, with a darker golden yellow (that is unnamed) on top to match the yellow in the dresses. I'm pretty happy with this design, too bad it's not on my hands!
Tuesday, October 18, 2011
30 Day Nail Challenge - Day 24 - Inspired by a Book
My "Inpired by a Book" nail art is of course inspired by this beautiful copy of Arabian Nights. This hardcover came out with a huge selections of all the classics, all with beautiful artsy covers. I got this for Xmas from my boyfriend Kevin :). It's blue, gold, and white intricate cover was super fun to recreate on my nails and looks crazy!
Thursday, October 13, 2011
30 Day Nail Challenge - Day 21 - Inspired by a Color
For "inspired by a color" I was inspired by my hair color! My hair is Ion Color "Darkest Brown" with a chunk of Manic Panic "Atomic Turquoise". It's a pretty simple design, as my hair is pretty simple. Just black tips, with 3 streaks of Sally Hansens "The Real Teal" on one side. But matches my hair perfectly!!
Tuesday, October 11, 2011
30 Day Nail Challenge - Day 17 - Glitter
I used LA Colors Allure, a pink-orange shimmery neon for the tips, and a black and purple striper to make the wispy lines, then I dumped some Sally Hansen glitter topcoat in Strobe Light and used my striper brush to paint lines on top of the purple and black. then glued on glitter dots randomly, flatback pearls, silver holo Playboy heads, and square and circle rhinestones in different sides. then like 6 coats of top coat.....
I like it, but to paint my other nails and remove with cotton balls, I have to wear gloves .
Glitter!
Wednesday, October 5, 2011
30 Day Nail Challenge - Day 12 - Stripes + Pink Wednesday
I've been neglecting my pink wednesdays but I'm back on track! I used Wet N Wild Dream Poppy to make a base French tip and striped on these weird intersecting lines in white and black for my challenge for today which is "Stripes"
It took me 4 tries to even figure out a design for today, so I don't have too much energy to write anything else. Oh yeah I'll say this: I'm so over the 30 day challenge. Who knew it would take like...a whole month? Sheesh!
Wednesday, September 28, 2011
30 Day Nail Challenege - Day 5 - Blue
I have revived a super old polish from the dead! I haven't used "The Real Teal" Sally Hansen Xtreme Wear in over a year; in fact, I had forgotten about it until Audrey came over to paint her nails and she picked this one out of the bunch. I added a few drops of thinner to make it new again and painted tips on all my fingers except my ring which has China Glazes "For Audrey". I used white, For Audrey, and The Real Teal to then stripe on some random stripes that intersect each other. I can't wait to get out of these color challenges! Like I said, just given a color, I'm feeling pretty uninspired.
Saturday, September 24, 2011
30 Day Nail Challenge - Day 1 - Red + 2 Quick Reviews
I've started the 30 Day Nail Challenge and day 1's category is RED. That's all it says. I actually hate red nail polish because it's my least favorite color, and even if I use a basecoat it stains my acrylics. I only have like 2 reds anyways and THIS ONE I actually bought for 4th of July 2010! (Wet N Wild - "Red Red") It was super thick but with a few drops of Beauty Secrets Nail Polish Thinner, I brought it back to life.
Quick Review on B.S. Polish Thinner: Works great, smells awful (duh), you get a lot for a few bucks, comes with a spout on the cap but you really need an eyedropper to be precise. Also I (stupidly) stored it on it's side inside my drawer and it leaked out and melted the rubber no-slip mat!!!
OK so what I've done here was a quick swipe across the tip in Red Red not completing a French smile line on one side. I completed the smile line with 3 black glittery stripes that intersect at the other side of the nail. Then I placed black holographic cut out stars and the punched out centers around the nails randomly and topped with a few coats of Beauty Secrets Hardening Top Coat.
My Quick Review on B.S. Hardening Top Coat: high gloss but needs at least 2 coats, takes a while to dry (at least 10 minutes for each coat), super fun huge ball-like bottle and about $2 cheaper than Seche Vite Dry Fast + it's a bigger bottle. I would buy this again if I when run out Seche Vite is not on sale. (This is why I decided to try it in the first place.)
And one more thing, readers: I still cannot comment on anyone's posts! When I write my comment it asks me to sign in again and repeats this over and over. If anyone knows what's going on, please help me! I really want to tell you all how much I love all your posts!!
Wednesday, May 18, 2011
Pink Wednesday: Stripes and Zebra Stripes
I'm really running out of pinks for Pink Wednesdays because all my pinks are hot or bright pinks and they all show up the same or really similar in pictures! This is OPIs Elephantastic Pink that Chrissy keeps leaving at my house. I painted my nails white, then a big bold stripe of pink diagonally, then I painted on zebras and out lined the pink with more black and added the stripes. I'm really proud of myself for taking my time on the straight stripes. Sometimes when I work too fast, I make them uneven and they look really bad, but this is good enough for me. Happy Pink Wednesday! and go to http://www.onwednesdayswewearpink.com to join us!
Tuesday, May 10, 2011
Floral Print on Creme de Menthe
So, I guess I wasn't happy with the roses I did for Chrissy's birthday a few posts back so I redid it on my first (unpublished) franken (never photo-ed) called Mint Julep. Note that I made it in a Seche Vite bottle. I do not reccomend anyone do this is in a Seche Vite Dry-Fast Top Coat bottle, because, while it was easy to mix, it thickened up quite fast. It was almost unusable after 2 weeks.
I still am not happy with the roses, or whatever kind of flower they are, but I like the color scheme, and I will definitely be posting a new floral print soon when I am satisfied with the result. Practice makes perfect.
Wednesday, May 4, 2011
Nautical Awesome-ness
I was at Forever21 and saw so much blue-and-white and red-and-white striped tops and dresses, all decked out with gold chains and anchors because, to no surprise to anyone, nautical stuff is still in.
I decided to a nautical nail design because I hope this will be the last summer that it's poppin because I don't look good in horizontal stripes. (hence, the V-tips)
Enjoy! I mean Ahoy!
Wednesday, January 26, 2011
Rasta and Yoshi Nail Night
Also, in response to No Naked Nails' Seche Vite blog post/question: Oddrey's natural nails painted with a coat of Seche Vite top coat are having the same peeling problem you described. I haven't had this problem, maybe because I have acrylics.
Oddrey and I were really better off painting her nails with an off brand top coat. They lasted an entire week without chipping or peeling.
Wednesday, December 15, 2010
Neons

I tried to do winter colors this holiday season, but it just wouldnt happen. I like having bright, colorful nails, and more importantly, neons. So heres a basic design with orange, yellow and green; the colors are the same on the other hand but in a different order. Black stripes and rhinestones. Short post- laters!
Tuesday, December 14, 2010
Cute ribbon stripes

I saw a design similar to this somewhere online, but unfortunately I'm unable to credit anyone because I can remember who it was, or even if I saw just a picture of it or on a nail tutorial on YouTube. sorry! But anyways, I wanted to do a design that looked like a present or nails wrapped up with bows, but I couldn't commit to holiday colors again (as I kept my candy cane nails for the weekend) so I caved and went with pinks and purples. I added some rhinestones but I know I will regret then later today when I'm cooking or trying to open up bobby pins.
Subscribe to:
Posts (Atom)