Showing posts with label flowers. Show all posts

Monday, January 9, 2012

Pastels and Kawaii Totoro Nail Art!!

Last night, my girlfriend and dear hand model Chrissy came over with yet another kawaii nail idea: Totoro nails!! Unfortunately my boyfriend was blocking my nail area while he played Kinect on Xbox so we had to make due with the polishes that were in my train case from the morning's out of the house gig I did on my friend Jessica. I laid down two coats of the creamy minty green "mint sorbet" by Sally Hansen. Followed by black spiky balls with white eyes, a white bunny, and a grey bunny- I will repost this with the names of the characters- sorry, Totoro fans!

My pink with flowers nail art is "Raise Awareness" by Essie. Laden with a rainbow glitter my dad gave me for Christmas and topped with "Mint Sorbet" and white flowers. The centers of the flowers are these pastel shiny dots that are actually the eyes that pop out of my playboy glitter! They were loose floating around the bag the glitter box came in and I saved them for a rainy day. Not so rainy was last night, but I was glad to find use for them!

Thursday, November 10, 2011

Fimo Fruits and Rhinestone Flowers (Pic Heavy!)

I finally got around to using my Fimo fruit slices! I've had them for a really long time and I've been dying to try them out! When I sat down to give me boring white French tips a fill, I had no idea what I was in for...

After my backfill, I drilled the tips super thin, but they were still white tips, so I had to cover them up with some color. I used a combination of blue, green, and pink iridescent hexagon glitters, lightly, just to add some color. The white remains as the base color. I topped with some fruit slices, mostly kiwi, strawberry, lemon, lime, Fuji apple, and watermelon. Then encased with a THICK layer of clear acrylic. (filed, shaped, and buffed, yadah yadah yadah...)

And added some colorful flowers made from rhinestones!

These are the things I used: the pink, green, and blue hex, Fimo fruit slice wheel, and 2 sizes of multi colored rhinestones: 1.5 mm and 2 mm, which I adhered at the very end with a lil top coat (after 3 coats of top coat on each nail dried)

Because I was just applying the fruits to the tips, there isn't much space to have a variety of the full shapes. I used a craft knife to slice some of the fruit in half.

(Carefully)! I did this to the limes, lemons, and the strawberries. It allowed for more fruit to be placed on each nail, and they laid a bit better on the nail too!
 
Here are all the fruits that came in my Fimo wheel (which I got for about $5 at Sally Beauty Supply). The ones I know for sure are lemon, strawberry, kiwi, 2 watermelons, lime, leaves, apple, and Fuji apple. The ones I'm not sure about are papaya, kumquat, and banana. But they are so weird looking that I'm not sure what they look like and I probably won't be using them. ><


Let me know what you guys think!! They are busy, but they are super shiny and the rhinestone flowers sparkle really nicely, especially in dim light. I'm digging it!

Saturday, November 5, 2011

Pink Flowers, Rhinestones, and Pink Striping Tape

So I've been meaning to upload this, I couldn't find my camera USB cable thing for a few days. These are Chrissy's nails, my lovely hand model. She thankfully gets her nails done for my blog when I don't want to do mine or when I have poop nails that need to be filled. :) I painted her nails white (she's always trying to paint them white and I always talk her out of it!). I then used a medium dotting tool to make drag-petal flowers with Essie Raise Awareness (light baby pink) and OPI Elepthantastic Pink. I put tiny purple and blue rhinestones onto the middle of the flowers. For her accent nail, I left the base white, and when dried, I used my new pink metallic striping tape to make a lil fishnet-esque grid. I laid down the striping tape where I wanted it and then used clippers to cut the tape off where the nail ended. I topped with top coat and was pleased with the design. I only put one layer of top coat on, as she had somewhere to go and she did not upkeep with more top coat at her house. She later told me that the pink striping tape had shed it's color! She sent me a picture on my phone of her stripes still intact, but the pink had rubbed off to a dull grey/silver!~!! I would post this picture, but it was on my phone and I am lazy. I will retry this design with more top coat to see if I have the same problem, and also add this to my earlier review of my nail haul post.

  I have 10 colors to try, so far, this is the only one I've used, and I'm very worried that it won't hold, because it's soo cute! Has anyone used striping tape like this? Or how would you use it?

Wednesday, October 19, 2011

30 Day Nail Challenge - Day 24 - Inspired by Fashion

Thanks, to my hand model Oddrey, I was able to do posts for my challenge without taking off my current nail design. I searched the word "fashion" on Google Images and found this trio of Gucci dresses that I picked as my inspiration for fashion nails. I used black, white, and Mellow Yellow by Sally Hansen, with a darker golden yellow (that is unnamed) on top to match the yellow in the dresses. I'm pretty happy with this design, too bad it's not on my hands!

Tuesday, October 18, 2011

Huge Post: Haul, Swatches, Reviews... (Pic Heavy)


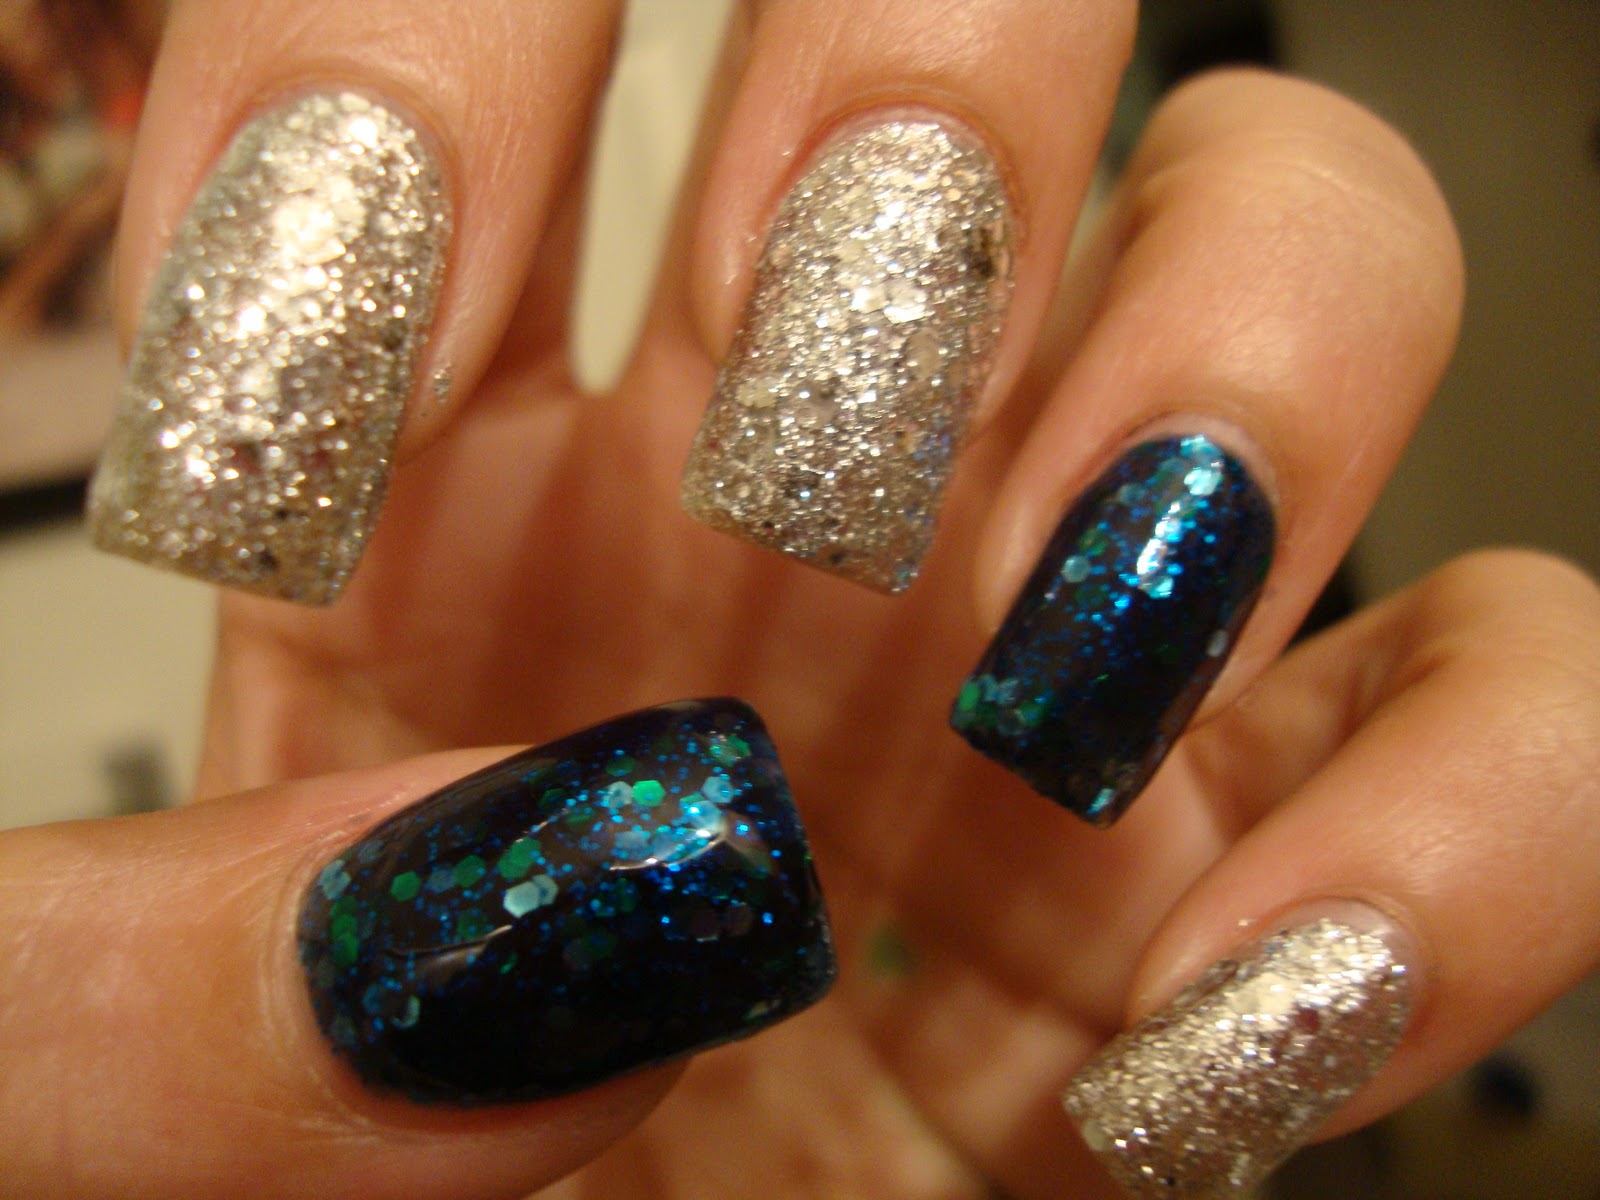
This is OPI's "Crown Me Already" from the Miss Universe Collection (the silver and large hex glitter). And the blue is "Across The Universe " by Deborah Lippmann.


OK let's start with 'Crown Me Already': I'm not sure if it was just this bottle, it's my friend Megan's and she ordered it online and she said when she recieved it a little bit had leaked out a bit. Not sure if it was a little think because of the insane amount of glitter, or because of the leak, but it was pretty hard to apply, and seemed to PUSH more polish out of the bottle each time I put the brush back in. I love the glitter, love the sparkle, but it was pretty hard to smooth out the texture, even with Seche Vite top coat. I also used a toothpick to push the large hexagon glitters around to keep my cuticle line clean looking.


"Across the Universe" is a dream glitter polish. It only took 2 medium coats to opaque and despite it being loaded with hexagons, it went on smooth, and had a jelly-like finish. It was smoothed out instantly with only one coat of Seche Vite. This is also Megan's polish. I got to swatch these while dog-sitting her super awesome golden retriever, Lady. Hey Megan!


YAY 3D acrylic! I'll go into details about that further down the page, as this is a swatch review for Essie's "Raise Awareness". It's Essie's breast cancer awareness pink and it is a lil tricky. I did read another review of this polish saying it was streaky and it is. I feel like when I'm painting tips it's even streakier vs. whole nail application. So this is two coats. I love the color, it would be less streaky with 3 coats, but I don't like to have heavy looking tips. I think that this polish would be less streaky in 3-4 months as it ages and becomes a little thicker.


Here is my pink nail drill I just got yesterday from Beauties Factory. Check it out here. I got it for about $25, and actually this is my replacement drill for the one I just got last month and BROKE. Now for this review I would like to make it clear that I BROKE the drill the first time. It did not come malfunctioning. Good news: the BF pink drill has a one year warranty, and this one was sent to me for $10 fee and I got to keep my other drill, it's cable, and drill bits. As for it's power: it goes up to 20,000 RPM (super fast and powerful) but so far I haven't had to use it at it's max speed; it does the job on medium. I've successfully filed a nail I had to put on today, and carved out the moon tips from my squared off nails. It did a fine job, my tips are sharp and more defined that with my previous battery powered drill. See above, the moon tips in my Essie "Raise Awareness" pictures. The only down side I have seen with this drill so far: it gets pretty warm in my hand after long use, and once it has overheated and slowed down. I turned it off for about 5 minutes, and was able to use it just fine again. I would reccomend this to any beginners for use on home acrylic application. And these are my acrylic brushes that I got JUST for doing 3D kawaii japanese nail art!!! and this 12 color set of acrylic powder. The colors are pretty random, but I'm not too picky about that right now these are just for practicing 3D stuff. I only paid about $2.50 for the 5 brush set (free shipping) and $6 or so for the acrylics also free shipping. It only took about 2 weeks to get here from China, and they are good enough quality to do a few little bows and flowers.


The website is here and it's insanely cheap for decent quality nail stuff like rhinestones, glitter, etc. So you should DEFINITELY check it out. Free shipping from China to US and came in a super decent amount of time. The comtainer that the acrylics came it was a little dusty (as shown) but I just dusted it off with a paper towel after I saw how yuck it was in the photo. None of it was spilled in shipping, but it was just a little dusty with powder. The brushes are super cute and the bristles are a nice soft sable hair for acrylic application, and they clean as well as my expensive ones from Sally's.


Well, if anyone read this whole thing, kudos to you, and I hope this was helpful for someone!


Saturday, October 8, 2011

30 Day Nail Challenge - Days 14 & 15 - Flowers and Delicate Print


I'm so behind! Here is Day 14: Flowers, I used Jesse's Girl "Baby Cakes" to sponge on the tips and then white a blue flowers just like in my purple post.

And here's my delicate print - I was on the phone so I got this idea from Erin but did a poop job- and I used Mink Muffs by Essie to load on a thick basecoat and while it was still wet, I pressed on little lace pieces I cut out. It probably would have looked better with topcoat, but I was kinda in a rush - just like I am right now because I'm still on the phone! Peace!

Thursday, September 29, 2011

30 Day Nail Challenge - Day 6 - Purple/Violet


Ahhh dreaded purple day. It's funny because I never paint my nails purple! I'm more green, pink, blue, black... but this design actually turned out nice. I would tell you which colors I used but unfortunately the two purples were given as a gift to me and I have discarded the box; the polishes are unbranded!! Clearly I used white Sinful Colors polish for the white flowers, as shown. 

I painted on light purple tips and used a dotting tool to drag dots into these cute little flowers ! I actually love this design so much I'm keeping it on until my next challenge for tomorrow. I definitely am going to try this again in other colors!

Sunday, September 25, 2011

30 Day Nail Challenge - Day 2 - Orange


DAY 2 - Orange. I used Sunny Side Up by Wet N Wild as the base for my French tip, sponged on a little bit of Mellow Yellow by Sally Hansen Hard As Nails in the corners of 3 of my nails. Then striped on these dainty little flowers in black and added these mini silver flatback dots that I found in my craft box. My inspiration for this design is based off of these little flowers from this artwork my brother painted and gave me for (our) birthday. We're twins :).  Here's the painting:


Friday, June 10, 2011

New Yellow Floral + Blogiversary Update


So I haven't been blogging very much since my nails have this silly glitter design on it. Here's Chrissy's nails that I did with a new China Glaze yellow which I can't tell you the name of it right now as it is stored away in my nail box and I'm too lazy to get it out. If you think you know what this color is, feel free to comment. It's like lemon drop or lemon fizz...


Also, my blogiversary is in less than a month, I don't know what I'll do for it, but my goal is to get 100 followers by then lol! I'm trying to do it on talent alone, as I am too poor for a giveaway, so if anyone wants to help me get 9 more followers, that would be awesome! Love you all and see you soon!

Wednesday, May 11, 2011

Pink Wednesday: Floral Print Tips


In honor of Pink Wednesday, I decided to work on my floral print again. It still kinda looks like my last floral print, I guess I'll have to just keep working at it.


I also decided to do this color "Dreamy Poppy" by Wet N Wild as the pink in the background because it is similar to Pantone's 2011 Color of the Year "Honeysuckle" which is a purple-pink coral color.


Hawaiian Flower Copycat


I got the idea to do a Hawaiian flower design from Annelise at http://www.nonakednails.com She is so cute, check out her original post here: http://www.nonakednails.com/2011/05/hawaiian-flowers.html. I used my new polish Wet N Wild's NERDS need Love Too. Then went at it with my dotting tool to make the petals and drag them into the center of each flower. I'm having a nail artist's block and can't figure out what to do now. If yall have any suggestions, let me know! I need inspiration.

Tuesday, May 10, 2011

Floral Print on Creme de Menthe


So, I guess I wasn't happy with the roses I did for Chrissy's birthday a few posts back so I redid it on my first (unpublished) franken (never photo-ed) called Mint Julep. Note that I made it in a Seche Vite bottle. I do not reccomend anyone do this is in a Seche Vite Dry-Fast Top Coat bottle, because, while it was easy to mix, it thickened up quite fast. It was almost unusable after 2 weeks.


I still am not happy with the roses, or whatever kind of flower they are, but I like the color scheme, and I will definitely be posting a new floral print soon when I am satisfied with the result. Practice makes perfect.

Wednesday, May 4, 2011

Yellow and Orange Flowers


So I filed my nails down super short and decided to paint them instead of doing tips. I thought I might be playing the piano in the next two weeks while my bf and I are house sitting his parents place.


I dunno how I feel about this but, it was fun for a day.

Monday, March 28, 2011

Roses are... Pink


Happy Birthday, Chrissy! These design was created for Chrissy for her birthday party which was yesterday... she wanted the nails to have roses to match her birthday dress. I was kind of scared to paint on roses but I do like a challenge. They turned out quite pretty, and I think Chrissy was pleased with the outcome. I'd let everyone know what they colors we used for it but she brought over her own polish and I didnt get a chance to write down which ones they were but I'll just credit it to OPI and fill it in later.
Yay.

Friday, January 14, 2011

New Job; New Nails!


So my NY's resolution was to get a job (after being unemployed from quitting my job last February, so almost a year sitting on my ass). But at least I learned something in 2010 a.k.a. the year of being broke. Being on a budget, I learned a few things about saving money by doing things myself. For instance, learning how to cook at home vs. going out to eat. And of course....doing my own nails! This blog has journaled my nail progress from the very beginning; I'm pretty proud of myself. I've saved money instead of going to the nail salons and even made a few bucks from doing my roomate and friends' nails! Anyways, that freeloader train gets off here and now I have a new job and it's only 2 weeks into the new year. I've decided to make a new resolution! I've decided that now that I have a job, I want to continue to update my blog once a week. So here are the designs from my first two days at my new job. The top one is just a basic French tip: base color, a turqouise frost "Respect The World" Nicole by OPI, with a green-blue chunky glitter on top by Sinful Colors called "Nail Junkie". I added some stickers of white flowers on there and then a buttload of topcoat to seal it. The stickers I rarely use, but can't forget to credit the girl who gave them to my for my birthday last year, my old roommate Allison. Hi Allison! Thanks for the stickers, I got lots of compliments on them! The second set are pink French tips with the base pink called "Pink Promenade Creme" by NYC with a coat of Sally Hansens HD pink-blue shimmer called "LCD" which in my opinion the best shade out of the Sally Hansen HD Collection. And threw in some cute flowers which I painted on with the nail art brushes I got from my girlfriend Harmony! Thanks Harmony! Love the nail are brushes, I feel complete with them in my nail box! While, I'm thanking so many people in this post, I might as well credit the rest of the people that helped make these two nail looks complete:
Thanks to:
Kevin, my love, for buying me Nail Junkie by Sinful Colors (and picking it out! Shh! He's not reading this blog anyways...)
Kirsty, my old roommate (miss you) who gave me the Sally Hansen HD polish last summer
aaaaand Julia, my other ex roommate who gave me the Respect the World by Nicole.
I know this is wordy but just in case anyone that has given me nail stuff and totally supported my obsessive hobby is reading this: Thanks, friends! Thanks for letting me do your nails hella crazy and for looking at mine up to 5x a day, and sometimes late at night! Love you guys, I couldn't have gotten this far without you.

Sunday, September 5, 2010

Fun With Mylar Flakes


Mylar Flakes aka Party Ice Confetti, is the arch enemy to my boyfriend. The poor guy already has to deal with drops of nail polish on his sweatpants, acrylic/monomer spills on the bed sheets, glitter EVERYWHERE, and now these flaky, light strips of, basically, pretty garbage plastic landed in his printer and is making it very very hard for him to print out his papers for school. :( Nevertheless these mylar flakes are gorgeous as pseudo French tips. I filed my acrylics down very thin and applied glue to my tips like a French tip, and rolled my fingers in the flakes. I shaped the smile line using an orange stick and covered them with clear acrylic. After filing, shaping and buffing them to perfection, I topped them with just top coat for a few days and then painted on these flowers and Konad flowers later on. This flower is from a previous post, but added a pink rhinestone to the center and then in a really subtle silver, stamped on Konad plate m5 (I'm pretty sure) to the other nails. I'm pretty happy with the way they turned out. I a fairly large bag of these Mylar flakes in the confetti section at Michaels, I think they were$1.99. I don't think I'll ever finish using this bag though because a little goes a really long way.

Saturday, July 24, 2010

Pretty Pretty Flower Nails


This "Blue Calypso" base color by Sally Hansen has a coat of Sally Hansen HD "Blu" on top and I am IN LOVE with it! I painted on these really cute flowers on a few of my nails and a few simple stripes on the rest. I will do a tutorial on how to do these flowers ON REQUEST... they are really easy, they just take a little patience. So if anyone needs to knw how to do the flowers, just comment below and I'll post a tutorial. I'm so bad, I get a few people asking me HOW to do my designs, but I promise I will start posting tutorials, but only if people ask nicely. :) Anyways, I just did an asymetrical blue tip, and these pretty flowers! It's too bad I did 2 girls right after I did my nails and they were ruined by the end of the night. I would have kept them on longer, but good thing I snapped a photo!

Wednesday, July 21, 2010

So behind... nails from last week!


This picture with my hand on rocks is actually my hand in a creek that was near when my boyfriend, my mom and I went on a hike in Truckee last Wednesday. Just thought it was a cool shot.
The white french tips are actually the first time I'd painted my nails white since I started doing my acrylics. I wanted to do them white because my whites are all getting too thick, so before they died I gave them one last hoorah as a base color before they retired to use only in designs. I used my dotting tool to make pink flowers and leaves, and actually at this time last week, I didn't have an opaque green, so I had to make this green out of a yellow and a bue to make the leaves around the flowers.